
How to Export Drivers from Windows 11
Exporting drivers from Windows 11 is a vital task for users looking to back up their drivers, especially before performing a system upgrade or a fresh installation. When you export drivers, you ensure that you can easily reinstall them later without searching for each one individually. This blog post will guide you through various methods to export drivers from Windows 11, providing detailed instructions and examples.
Key Points
- Backing up drivers helps avoid compatibility issues during OS upgrades.
- Use built-in tools like PowerShell and Command Prompt for easy driver export.
- Regularly exporting drivers can save time and effort during system maintenance.
Introduction to Driver Exporting
Drivers act as the communication bridge between your operating system and hardware devices. Every piece of hardware, whether it is a printer, graphics card, or network adapter, requires a driver to function correctly. Over time, drivers can become outdated or corrupted, which may lead to hardware malfunctions or performance issues. Therefore, having a backup of your drivers can save you from many headaches.
Windows 11 provides several built-in tools that allow users to export their drivers efficiently. This blog post will explore different methods of exporting drivers, including PowerShell, Command Prompt, and the Deployment Image Servicing and Management (DISM) tool. Each method will be explained in detail, ensuring you have all the necessary commands and knowledge to carry out the process successfully.
What is the Purpose of Exporting Drivers?
Exporting drivers serves several purposes. First, it helps create a backup, ensuring that if you reinstall or upgrade your operating system, you have all the necessary drivers ready to install. Second, this process can also facilitate transferring drivers to another computer. For example, if you have a similar machine, you can quickly apply the same drivers without needing to download them again. Lastly, having a collection of drivers stored on a USB drive or external hard drive can speed up the process of restoring functionality to your hardware after a clean installation.
What Tools are Available to Export Drivers?
Windows 11 includes several built-in tools for exporting drivers. The most commonly used tools are:
- PowerShell: This command-line shell allows users to run various commands to manage the system.
- Command Prompt: This traditional command-line interface can execute a range of commands, including driver management.
- DISM: The Deployment Image Servicing and Management tool helps manage Windows images and can also be used to export drivers.
Using any of these tools can make the process efficient and straightforward.
How to Export Drivers Using PowerShell?
To export drivers using PowerShell, follow these steps:
- Open PowerShell as Administrator:
- Press Windows + X and select Windows Terminal (Admin) or search for PowerShell in the Start menu, right-click it, and choose Run as administrator.
- Run the Export Command:
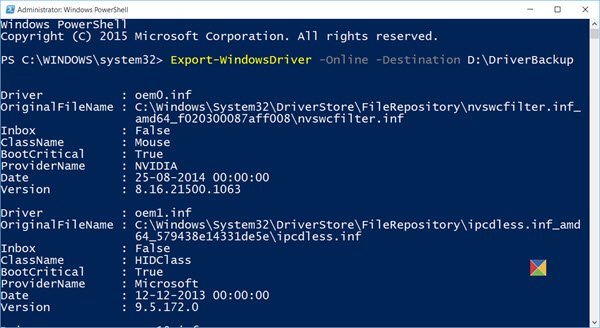
Enter the following command to export all third-party drivers:
Export-WindowsDriver -Online -Destination “C:\DriverBackup”
- Replace “C:\DriverBackup” with your preferred backup folder.
- Verify Export:
- Navigate to the destination folder to ensure that the drivers have been successfully exported.
The above steps show a simple and effective way to use PowerShell for driver management. It is advisable to create a dedicated folder for your backups to keep things organized.
How to Export Drivers Using Command Prompt?
Exporting drivers using the Command Prompt involves similar steps as PowerShell. Here’s how to do it:
- Open Command Prompt as Administrator:
- Search for cmd, right-click on Command Prompt, and choose Run as administrator.
- Run the Export Command:
Use the following command to export all drivers:
pnputil /export-driver * “C:\DriverBackup”
- Change “C:\DriverBackup” to your desired folder.
- Check the Output:
- Visit the specified folder to confirm that your drivers have been exported.
Command Prompt is a familiar tool for many users, and its straightforward command structure makes it easy to manage drivers without needing extensive technical knowledge.
How to Export Drivers Using DISM?
The DISM tool provides another method for exporting drivers, especially useful when dealing with offline images. Here’s how to use it:
- Open PowerShell or Command Prompt as Administrator.
- Run the DISM Command:
Enter the following command:
DISM /Online /Export-Driver /Destination:C:\DriverBackup
- Modify the destination path as required.
- Review the Results:
- Check the designated folder to ensure your drivers were exported successfully.
DISM is particularly useful for users who may need to create or modify Windows images. It is a powerful tool that provides a deeper level of control over the system.
Comparison of Driver Export Methods
| Method | Ease of Use | Backup Scope | Additional Features |
| PowerShell | Easy | Third-party drivers only | Can manage online/offline images |
| Command Prompt | Easy | All drivers | Basic driver management commands |
| DISM | Moderate | Drivers from offline images | Advanced image management tools |
This comparison table illustrates that while all three methods are effective for driver export, they each serve different user needs and scenarios.
Important Notes on Driver Exporting
Note: Always ensure you have sufficient storage in your destination folder before beginning the export process.
Note: If exporting drivers for multiple devices, verify that all required drivers are included.
Using these notes, users can avoid common pitfalls and ensure a smooth exporting experience.
Conclusion on Exporting Drivers
Exporting drivers from Windows 11 is a straightforward process that can be accomplished using PowerShell, Command Prompt, or DISM. Each method offers unique advantages, making it essential for users to choose the one that best suits their needs. By regularly exporting drivers, users can ensure they are prepared for system upgrades or reinstalls, saving time and effort in the long run.
Backing up your drivers not only helps maintain system performance but also provides peace of mind, knowing that you have all the necessary files at hand. In a world where technology constantly evolves, being proactive with driver management is essential.
FAQ’s
- What are drivers, and why do I need to export them?
Drivers are software components that allow your operating system to communicate with hardware. Exporting them ensures you have backups ready for reinstallation. - Can I use third-party software to export drivers?
Yes, there are third-party applications available, but using built-in Windows tools is often simpler and more effective. - Is it safe to delete drivers after exporting them?
It is generally safe to delete drivers once you have successfully exported them, but ensure you have a backup before doing so. - Can I export drivers from an offline Windows installation?
Yes, using the DISM tool allows you to export drivers from an offline Windows image. - How often should I export my drivers?
It is advisable to export your drivers whenever you update them or before significant system changes. - Will exporting drivers affect my current system performance?
No, exporting drivers does not affect system performance; it only creates a backup for future use. - What if I encounter errors while exporting drivers?
Ensure you are running the commands with administrative privileges and that your destination folder has enough space. If issues persist, check for system updates or driver compatibility.By following these guidelines and instructions, you can effectively manage your drivers and ensure a smooth experience when using Windows 11.