
Network Address Translation (NAT) plays a crucial role in how your device connects to the internet and communicates with other devices. Checking your NAT type is important, especially for gamers who want a smooth online experience. NAT types can affect your ability to connect to multiplayer games and communicate with other players. Understanding how to determine your NAT type can help you troubleshoot connectivity issues and improve your overall network performance. Easily Check Your NAT Type on Windows 11
Key Points:
- NAT types can affect online gaming connectivity.
- An Open NAT type allows for seamless multiplayer connections.
- Knowing how to check your NAT type can help you optimize your network settings.
What Is NAT and Why Is It Important?
NAT stands for Network Address Translation. It enables devices on a local network to communicate with external networks, such as the internet, using a single public IP address. This process translates private IP addresses to a public IP address and vice versa. NAT is important for several reasons. It helps maintain security by hiding internal IP addresses, conserves the number of public IP addresses required, and facilitates network connectivity for multiple devices.
Different NAT types can affect your online experience, especially when playing games. NAT types are generally classified into three categories: Open, Moderate, and Strict. An Open NAT type allows for easy connections with other players and games, whereas a Strict NAT type can lead to connection issues and limited communication with other players.
How to Check Your NAT Type on Windows 11
Step 1: Open the Settings App
Begin by clicking the Start button in the taskbar. This action opens the Start menu. From there, select the gear icon to access the Settings app. Alternatively, you can press Windows + I on your keyboard to open the Settings directly.
Step 2: Navigate to Network & Internet
Within the Settings window, look for the Network & Internet option in the left sidebar. Click on it to access network-related settings. This section allows you to view and modify various network settings, including Wi-Fi, Ethernet, and VPN connections.
Step 3: Access Advanced Network Settings
Scroll down in the Network & Internet settings until you find the Advanced network settings option. Click on this to open more detailed network options. Advanced network settings provide access to various diagnostic tools that can help you understand your network’s performance.
Step 4: Run the Network Troubleshooter
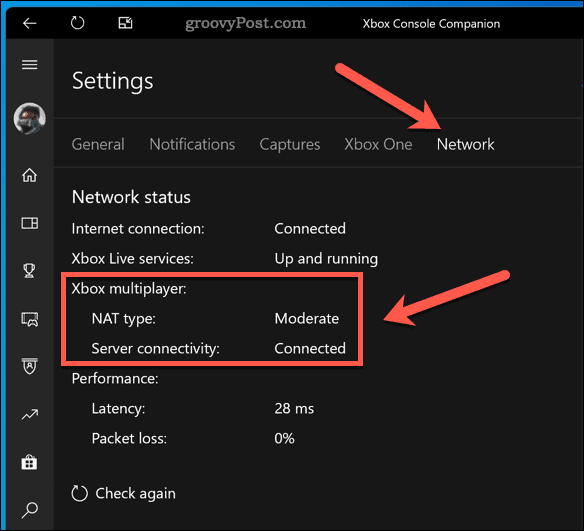
In the Advanced network settings section, locate the Network troubleshooter. Click on it to start the troubleshooting process. This tool automatically detects issues with your network connection and can provide insights into your NAT type. After running the troubleshooter, look for the Detailed Info section. This area will display your current NAT type.
Step 5: Check Your Router Settings
Sometimes, you may need to check your router settings to gain more detailed information about your NAT type. Open a web browser and enter your router’s IP address in the address bar. The most common addresses are 192.168.1.1 or 192.168.0.1. Log in with your admin credentials, which are often found on the router or in its manual.
In the router settings, navigate to the WAN or Internet section. Here, you may find your NAT type indicated as Open, Moderate, or Strict.
Understanding check NAT Types windows 11
NAT types can significantly affect your online experience. Here is a comparison of the three main types:
| NAT Type | Description | Connectivity Issues |
| Open | Allows full connectivity to other players | Minimal issues; can connect easily |
| Moderate | Allows some connectivity but has restrictions | Some issues; may limit multiplayer |
| Strict | Limited connectivity to other players | Major issues; often unable to connect |
Open NAT is the most desirable type for gamers. It allows seamless connections to other players, leading to a smoother gaming experience. On the other hand, a Strict NAT can lead to difficulties in joining games or communicating with friends.
Common Causes of Strict NAT Type
Understanding why you may have a Strict NAT type is crucial for troubleshooting. Common causes include:
- Router settings: Certain configurations in your router can restrict NAT type.
- Firewall settings: Firewalls can block necessary ports, leading to connectivity issues.
- ISP limitations: Some Internet Service Providers may impose restrictions on NAT types.
Resolving these issues often requires adjusting your router settings or contacting your ISP for assistance.
How to Change Your NAT Type
If you find that your NAT type is not ideal, you may want to change it. Here are a few methods to help you achieve a better NAT type:
Enable UPnP (Universal Plug and Play)
Enabling UPnP on your router allows devices on your network to automatically configure port settings. This step can help change your NAT type to Open.
- Log into your router settings using the method described earlier.
- Locate the UPnP option, typically found in the Advanced or Network section.
- Enable UPnP and save your settings.
Use Port Forwarding
Port forwarding allows specific traffic to bypass the router’s firewall, helping to improve NAT type. This process can be more complex, as it requires knowing which ports to forward for specific games or applications.
- Log into your router settings.
- Find the Port Forwarding section.
- Enter the required port numbers for the game or application.
- Save your settings and restart the router.
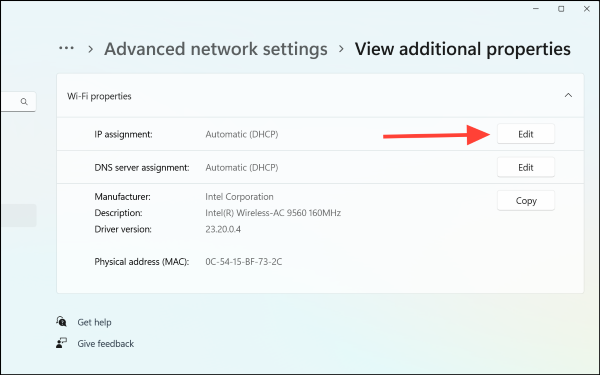
Disable IPv6
Some users find that disabling IPv6 can help improve their NAT type. This step is particularly useful if you are experiencing connectivity issues.
- Go to your network connection settings.
- Locate your active connection (Wi-Fi or Ethernet) and open its properties.
- Uncheck the Internet Protocol Version 6 (IPv6) option.
- Save your changes and restart your device.
Use a Wired Connection
A wired connection can provide a more stable and reliable network connection compared to Wi-Fi. If possible, connect your device directly to the router using an Ethernet cable. This step can help reduce latency and improve your NAT type.
Restart Your Router
Sometimes, simply restarting your router can resolve NAT-related issues. This action can refresh your connection and potentially change your NAT type.
Conclusion
Checking your NAT type on Windows 11 is a straightforward process that can significantly impact your online experience. By understanding your NAT type and taking steps to optimize it, you can improve connectivity for online gaming and other applications.
Start by using the built-in Network troubleshooter in Windows 11 to determine your NAT type, and make adjustments as needed through your router settings. Implementing changes such as enabling UPnP, using port forwarding, and opting for a wired connection can help ensure a smoother gaming experience.
If you encounter difficulties, consider consulting your ISP for further assistance or exploring additional network diagnostics tools. A well-configured NAT type can lead to a more enjoyable online experience.
FAQs
What is NAT type?
NAT type determines how easily your device connects to others on the internet. It can affect online gaming and communication.
How can I check my NAT type on Windows 11?
Open the Settings app, navigate to Network & Internet, access Advanced network settings, and run the Network troubleshooter to view your NAT type.
What should I do if my NAT type is strict?
Consider enabling UPnP, using port forwarding, or adjusting your router settings. A wired connection can also help improve your NAT type.
Does NAT type affect gaming?
Yes, NAT type can significantly affect gaming performance. An Open NAT type allows for smoother connections, while a Strict type can lead to connection issues.